17 April 2010

1/144 MSN-01 PsyCo Zaku - almost done building it

Sanded all seamlines and clued alot of the remaining parts, like head, 'feet' for the leg-thruster etc. (which need to be sanded,... again)
I was surprised that there is some additional movement for the 'feet', but since not everything is clued together yet, you'll have to wait till it's clued, in order to see what kind of posability I'm referring to.

(I'll paint the black for the eye with enamel paint and remove excess black paint with lighter fluid, however, the stripe on top of the head isn't clued yet, since I don't know if I'll put the eye there - as always, time will tell)

Many parts aren't clued yet. I will keep it that way, in order to paint the parts more easily.
What's left on the agenda, before painting? removing seamlines, and putty some caps, which occured on some parts being clued together.
Also done one simple mod again - installed a PE PolyCap at it's bottom (for an ActionBase of course).

(Basically a 3mm hole and an according polycap - fixed using epoxy putty)

(Comparison with the 1/144 HGUC Zaku II)

16 April 2010

1/144 MSN-01 PsyCo Zaku - damn many seamlines!

Continued working on the PsyCo Zaku, thanks to the sheer amount of seam lines, I was forced to stop working on it and started working on some mods - well, only did 1 so far.

head currently put together using masking tape (how will I paint the eye-piece?)

Clued almost all parts together, but will have to remove the seam lines next prior clueing additional parts onto them.
(I have the feeling that this is the most time consuming part in building this kit)
Also modded it's left arm - I tried to make it de- and retachable, but it's just a way to complicated, so it will have a permanently detached arm.


Added alot of wire for the arm - still able to shorten it, if it proofs to be too long.
Besides the arm itself, I also modded the hands - I don't wanted the slight bend original fingers, so I used parts of the sprues to make my own straight fingers, like on the box art - also drilled holes on the front.


Will either be used for addition detail, or for leftover Beam Sabre effect parts - time will tell.

Well, that's the modding done so far, but how's the posability of this 26 year old Gunpla?
For the arms, they are quiet good -altough no PE for the Polycaps, it still has the same a slightly better posability than the HG GM[G] from the HG 08th MS Team line.

 Hard to tell, the shoulders can bend forward/backward a little bit

Arm can bend all the way up abd rotate at the shoulder, and the head can turn 360

Elbow can bend about 60 degree and rorate below the shoulder

Although the legs thrusters arent assembled yet, you already saw all the posability this MSN-01 kit is capable of.
So far for the MSN-01 - might finish building (not painting) it this weekend.
See ya next time!
Oh, regarding the eye piece - currently thinking of clueing the head together, removing seam lines, and painting the eye piece with black enamel paint after everything else is painted.
*Neither waist nor leg thrusters will be able to move - everything below the waist is fixposed, altough posabilty might be possible for a, not available, HG or even MG treatment - or if you're going to mod the according parts, which I'm not going to do.

P.S.:
Did you know that the RX-0 Unicorn Gundam is, technically, a Zaku? (Atleast according to my theory)
Might post a graph showcasing the relation.

15 April 2010

1/144 MSN-01 PsyCo Zaku

PsyCo, PsyCho, PsyCommu, PsyChommu, or even SyCommu - it's a matter of taste how you call this - I prefere PsyCo(mmu)

Well, anyways, a small update on the PsyCo Zaku.
Since it doesn't feature snap assembly, building will take a while.
I only clue a few parts at a time, waiting for the clue to dry, and sand the excess clue in order to remove the seamline, prior adding other parts to it.
Well, this results that I was just able to get both shoulders and the inside of the head done (the piece where the mono-eye decal will be applied to).


Currently thinking of a way to make the arms detachable (since the arms are like the Zeong's wire guided) and the best way to paint/build the head.

So Far for the progress, now a look on some contents of the box.


Of course you will get the construction manual - it feels surprisingly familiar if you build older High Grade kits like the GM(G). Well, some difference - the construction manual will focus on the construction alone - nowadays, the manual also contains backstory and such. However, You'll get a 'mechanical file' of the 'Sycommu'[sic] Zaku - well, basically just a printed cardboard (this makes me wanna collect more MSV kits). It features alot of backstory aswell aswell a guide on where to apply the decals.

speaking of decals, a small sheet of waterslide decals is included aswell


alot of 2's and arrows - one mono-eye - that's about it.
the MSN-01 at the bottom just seems to help you to recognize that this decal sheet belongs to the PsyCommu Zaku (since the MSN-01 is linked to the BANDAI) - or if you're making a custom display base.

Back to the future!

More like back to the past

2 weeks ago, I ordere a 1/144 PsyCommu Zaku (HiMo) at HLJ - it was said to be 'out of stock' back then, so I ordered it, hoping that they might get some sooner or later. (Although I had doubts)
Well, 1 day later, checking e-mails, I got mail that HLJ got my money for this item - wow, they had atleast 1 in stock!
Today, I received it - the mold looks good, has a small sheet of waterslide decals for detail, but besides that, it's one old kit (...but wasn't able to find any info about the original release date*).
What does old kit mean?


everything is molded in one color (white in this case), only PS plastic (therefore no PE Poly Caps for the joints). alot of seam lines etc.
Since it's an (almost) all-white kit, painting will be easy, and masking will only be required for details, like the thruster and red stripes.
Not build yet (currently working on the MG Ball base), but I hope, that this kit from the 80's already has the same quality in terms of 'fit', from their nowaday snap fit kits.

(... oh my,... just got a stupid idea,.... which requires a 1/144 zakuI, Hi-Zack, Zaku III, Geara Zulu, Zeong, Jagd Doga, Sazabi and maybe in fall this year Sinanju,...)

*edit: Should have taken a look on the runners earlier - the year this model was first released was 1984 - 4 years after First Gundam and 1 year prior Z Gundam

1/100 RB-79 Mobile Pod Ball 'Ver. Ka'

As promised, photos of the 1/100 MG Ball, which was codenamed 'two-face' for one particular reason!


Can you tell already? If not, here's another hint


You might notice, that I painted only half of the exterior.


Because it's the Clear Parts campaign version!

I always wanted to paint/build a model like that, and the 1/100 MG Ball was the only Gunpla from the clear parts campaign which featured plenty enough clear parts to accomplish this.
In fact, the Ball has an additional A-Plate (which is clear,... obviously), featuring all parts for the hull of the mainbody.
While removing the masking tape after painting, I was pleased with the results, however - I masked the wrong half on one part (and I first noticed this while assembling the Ball).


And I wasn't able to apply the masking tape at the exact middle of all parts, resulting in some minor inconsistencies.


Also painted the innerframe of course - but sadly, alot of detail got overshadowed by the clear parts and the chrome painted grid.

Besides the clear parts, I installed 3 LEDs (one white and two green), illuminating the cockpit and the side,... windows I suppose.
However, the base isn't finished yet - I gotta find some way to hide the batteries and switch inside the display base.
(And need to practice painting the 1/100 scale figures)


Apart from this and the falsely masked part, I'm satisfied with my work

14 April 2010

'Two-Face' finished - to be revealed tomorrow.

とある地球連邦のパイロット

Just a little teaser picture of a certain earth federal pilot. (to aru chikyuu renpou no pairotto)


I installed a LED for the cockpit to illuminate the pilot figuren.
Will post more pictures of this certain earth federal mecha tomorrow!

13 April 2010

Caught in the trap of figurines?

Recently checked my HLJ preorders and was, to a degree, shocked to see that I have alot of figurines on preorder. Starting with plamo-like figurines:
This month, my first Kotobukiya Plamo will be purchased - the 1/1 scale (OMFG HUGE!!!) RRX-7.8 Combat-san (included model number due the obvious Gundam reference) from the HoiHoi-san franchise.


I wasn't able to get some info on the exact release date so far - only able to confirm the april release.
Although I don't have Combat-san yet, I already preordered Pest-X-san awell.


Again a Kotobukiya kit, Pest-X-San will be released in june this year - again the enormous 1/1 scale, again towering roughly 13cm for the price of 3.000 yen - well, more expensive than the average highgrade Gundam kit, but let's wait for Combat-san to see, if the figure/plamo is worth the money.

Still taking a look on posable figurines, I pre-ordered one (thinking about a second (one to play with, and one to collect) Figma Black Rock Shooter from Max Factory!


Just 2667 yen excl. tax (2800yen incl. tax) - Kotobukiya,... why is the 13,5 cm Combat-san/Pest-X-san plamo more expensive than the prepainted 14cm Figma figurine?
Anyways - includes the ridiculous large Rock Cannon, the blade, eye effect part thingy, and a 2nd stand for the cannon. So far, it looks really good, and will be my first Figma figurine.

For the fix posed figurines, in the next few days, the Hatsune Miku 'Premium Figure' will be released (or put into ufo catchers for people to spend their money, getting the figure).

(source: sega.jp)

This time featuring a blue color scheme instead of the green/cyan (I prefere the blue one) and it's 24cm in heigth!

Last, and with least information available at the moment, is, again, a prize item from Sega - a Misaka Mikoto figurine from 'to aru kagaku no choudenjibou (reerugan)' ('a certain scientific electromagnetic rifle (railgun)') (July release)

Will I be able to escape the maelstrom of figurines? Who is 'Two-Face'? And why are banana yellow, and not red, like pepper, tomatoes, strawberries, cherries? And will we ever get a MG Geara Doga? This, and similar things, in the next post of 'Gousti-chan no burogu'!

10 April 2010

Another HGUC - another OYW Suit

Hello Kitty!
Hi Gogg!
Hy-Gogg

The MSM-03C Hy-Gogg - what a pretty ugly interesting Suit!
Debuted in the first few minutes of the first episode of 'Gundam 0080 - War in the Pocket', it was followed by serveral video game appearances and plamo of course! Currently, the most advanced plamo available for the Hy-Gogg is the HGUC version. I'd like to see a MG version of it, but I'll talk about it later.

Back to the Hy-Gogg itself. The Hy-Gogg is one Suit which, similar to Xamel, Z'Gok, Aguy etc., isn't that much humanoid as Zaku, Gundam etc.
Starting with the height, it's the smallest MS* from the OYW I know of, measuring 15.4m. The main reason for this is the fact, that the actual head was immgrated into the upper torso, which itself has the same height like a Zaku, but fatter (afterall, it also contains 4 torpedo launchers and 2 120mm machine guns). 
Two extremely long 'flexible arms' are attached to the torso, covered by two huge shoulder armors, which can act as a shield, similar to the Zaku Shield. At the end of the arm, you'll finde two big hands, each having 4 'vice claws' and one Mega Particle Cannon (explaining the size of the hands).
The hand can also be equipped with a 'Hand Missle Unit', which looks like a huge propellant tank, but actually just seems to cover the missle head, in order to prevent accidental ignitions.
Equipped with hand missle unit or not, the arm can retract and the shoulder armor can fold down, making it more streamlined, improving underwater movement.
The waist and leg aren't that special, so no need to talk about them.
The feet however are shaped like a plus/+. which fold it in order to improve underwater maneuverability.
All those things are what I like about the Hy-Gogg, therefore I had to buy it!
Anyways, (somewhat) onto the model itself!
The Hy-Gogg contains 4 runners (3PS 1ABS) + PolyCap set nr. 123 - well worth 1200yen in my opinion.
One nice feature is on the A-Plate - although the eye is fix posed (-), it's a part, and not a sticker (+), clear red (+), and even fluorescent! (+) - illuminating the dark pink/bright red eye with an UV LED results in some nice pink monoeye - bandai, I know this kit is about 6 to 7 years old already, but please, I want this kind of clear red/pink eye with new model kits!
Speaking of 6 to 7 years, I feel that the mold was getting old, resulting in much more loose parts.
Bending the arms to the sides, they will fall down fairly fast. The left hand won't even want to stay in place - it feels like I missed a Polycap, which I didn't (otherwise the joint wouldn't connect).
The upper knee joint is quiet loose on both legs, making it difficult to perform some nice dynamic poses.
Well, maybe it's just my Hy-Gogg - anyway, since it will be fix posed eventually, I will clue some parts, ensuring that they won't move (that) much after being finished.

So far for the kit - onto what I've done.
-Installed an UV LED into the torso (surprisingly easy task)
-made a custom effect part for a missle from the hand missle launcher
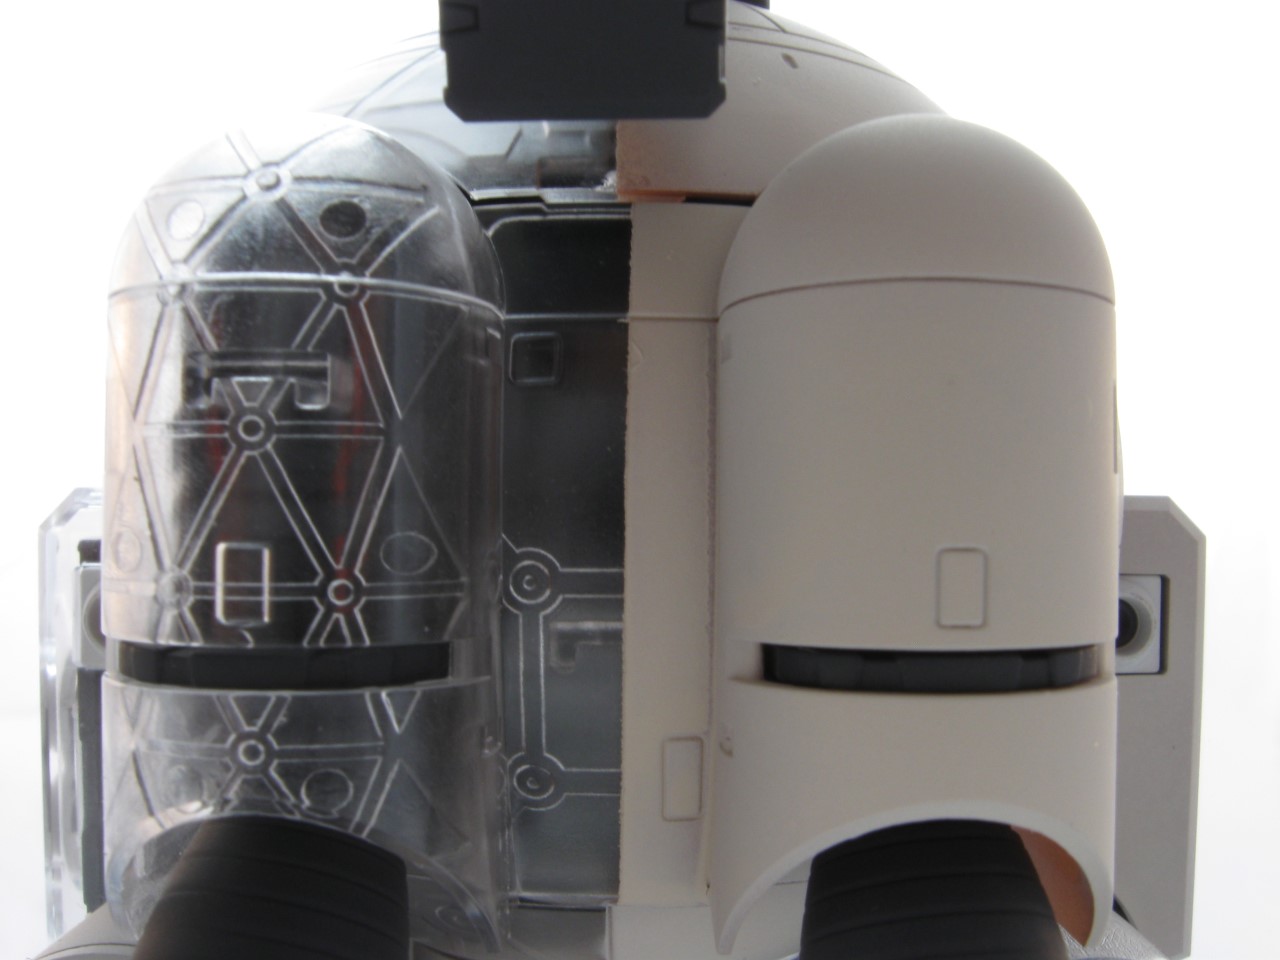
-modified one hand missle launcher container thingy (need to do touch ups)
-drilled holes for the 120mm MG (lower torse), for more depth
-'custom' panel lines (former seam lines on the upper torso, which can't be removed that easily due the lower torso)

I see you!

 *spotted*

 the modified 'hand missle unit' parts on the left, the original on the right

What to do prior painting/weathering :
-posing the hand missle unit hull parts
-laying the cable for the LED
-removing seam lines

Why Do I think that a MG is possible? Most features of this MS already have been tested/utilized with prior MG kits (the retraction of the flexible arm and the eye movement was introduced with the MSM-07S Char Z'Gok kit, the contractible feet with the MSM-04 Aguy (it's arms))
Why isn't there a MG yet? Probably due difficulties in recreating the hand missle unit hull (6 hull parts + a lot of locks) and due the lack of demand.

So,... somebody who knows a good, cheap way how to create water for a diorama? ^_^'

*excluding Guntank

04 April 2010

HGUC ZakuII display base - pt. 3 - mounted

Gotta take some proper photos next


Drilled a hole with 2mm diameter and fixed the feet using a 2,7mm screw from below the display base, nothing fency.
With the feet mounted onto the base, you can do some more dynamic poses (proper photos to follow)


Satisfied with my work, but will have to take some good photo.

HGUC ZakuII display base - pt. 2 - painted

Painted the footprint by now.

Well, for painting, I used a mixing dish, water for thinning, some gloss brown acrylic airbrush color, Revell Aqua Color 'Dark Earth' (flat, acrylic aswell) and some brushes of course!


First, I thinned some 'Dark Earth' so it has the same viscosity as the airbrush color (like milk) and painted one layer of paint on the epoxy. Next, painted the the inside of the foot with the gloss brown color.
Well, that's about it.
Why I thinned the Dark Earth color? With a high viscosity, the paint isn't fully covering the epoxy, resulting in some shading of the surface, plus it results in far less (or none in this case) brush strokes, after it dried.


Satisfied so far.
What's left is to mount the, still to be weathered, foot onto the base, which will be done next.

03 April 2010

HGUC ZakuII display base

Returning to Earth after 2 spaceborn Suits

Have been working a long time on my HGUC Zaku II (recently finished painting it), and I'm about to weather the Zaku and mount it onto the display base.
After my Hi-v Gundam, I decided to do again some more dynamic posing for the Zaku, but first of all, I had to build myself a base for it.


Again, I used a base which was included with an HG00 Gadessa kit and such, like I did with my HGUC Geara Doga.
Instead of puttying the holes, I clued a piece of 0,3mm Plaplate on top of it and cut the excess styrene using a design knife.
Afterwards, painted it with a gloss brown acrylic color (the same brown color I used for my old HGUC Dom Tropen) in order to emulate a wooden look - looks quiet good in my opinion.
Anyways, masked the edges of the base, used some spray clue (or how to call this) and applied artificial gras on top of it.
Well, since I will permanently fix the Zaku to the display base, I want to have some footprint-effect aswell. How do I do that?


For my attempt, I'll be using the Zaku foot of course, some plastic wrap, epoxy putty, the display base, some water and of course some tools for sculpting.


First, take some epoxy putty and make yourself a 'sausage'. Once the sausage is completed, thake the foot, wrap it in the plastic wrap, apply the epoxy sausage on the edge of the foot, which should be seperated from the putty with a layer of plastic wrap of course, and push it onto the ground.


Now you can sculpt the putty carefully, but I don't recommend taking the plasticwrap off the epoxy now, until it fully hardened.
Epoxy Putty is quiet sticky and can be difficult to sculpt, however, if you wet your tools, the adhesion of the putty will be eliminated, allowing far easier sculpting.


If you're satisfied with you work, you have to leave the putty to harden for several hours - I will take a break until tomorrow.
See you next time!